constforceRedirect=(path:string)=>{return({request}:{request:Request})=>{consturl=newURL(request.url);constcurrentPath=url.pathname;if(currentPath===path){console.log(`이미 ${path}에 있음 - 리다이렉트 안 함`);returnnull;}returnredirect(path);};};
이제 /notice-page가 아닐 경우, redirect로 notice 페이지로 전환될 것이다.
import{createBrowserRouter,createRoutesFromElements,Route,RouterProvider,Outlet,Link,redirect,}from"react-router-dom";constforceRedirect = (path: string)=>{return({request}:{request: Request })=>{consturl = new URL(request.url);constcurrentPath = url.pathname;if(currentPath === path){console.log(`이미 ${path}에 있음 - 리다이렉트 안 함`);returnnull;}console.log(`${currentPath}에서 ${path}로 리다이렉트`);returnredirect(path);};};functionHomePage(){return(<divstyle={{padding:"20px",border:"1px solid #ccc",borderRadius:"4px"}}><h1>Home Page</h1><p>This is the home page.</p></div>);}functionService1Page(){return(<divstyle={{padding:"20px",border:"1px solid #ccc",borderRadius:"4px"}}><h1>Service 1 Page</h1><p>This is Service 1 page.</p></div>);}functionService2Page(){return(<divstyle={{padding:"20px",border:"1px solid #ccc",borderRadius:"4px"}}><h1>Service 2 Page</h1><p>This is Service 2 page.</p></div>);}functionNoticePage(){return(<divstyle={{padding:"24px",border:"1px solid #e2e8f0",borderRadius:"8px",backgroundColor:"#fafafa"}}><h1style={{color:"#0f172a",fontSize:"1.25rem",fontWeight:"600",marginBottom:"8px"}}>Notice Page</h1><pstyle={{color:"#64748b",fontSize:"0.875rem"}}>
This is Notice page. This is a protected route.
</p></div>);}functionLayout(){return(<divstyle={{padding:"20px",fontFamily:"sans-serif"}}><Outlet/></div>);}constrouter = createBrowserRouter(createRoutesFromElements(<Routepath="/"element={<Layout/>}loader={forceRedirect("/notice-page")}><Routeindexelement={<HomePage/>}/><Routepath="service1"element={<Service1Page/>}/><Routepath="service2"element={<Service2Page/>}/><Routepath="notice-page"element={<NoticePage/>}/></Route>));exportdefaultfunctionApp(){return<RouterProviderrouter={router}/>;}
해당 기능을 간략히 구현한 뒤, QA를 요청했다.
다른 용무로 디자이너와 상의하는데, 왼쪽 상단에 존재하는 Logo를 클릭하니 로그인 페이지로 떡하니 이동하는게 아닌가..;
당황해서 자리에 돌아온 뒤, QA 요청을 잠깐 홀딩하고 해당 기능을 수정했다.
constNoticePage=()=>{return(<divstyle={{padding:"20px"}}><h1>Notice Page</h1><p>This is Notice page. This is a protected route.</p><Linkto="/">Go to Home</Link>// here!!! 🙋♂️</div>);};
예시를 위해, Notice Page에 Link태그를 추가했다.
그리고 페이지 이동을 시도하면, 페이지 이동이 가능하다.
즉, loader가 동작하지 않는 것이다.
import{createBrowserRouter,createRoutesFromElements,Route,RouterProvider,Outlet,Link,redirect,}from"react-router-dom";constforceRedirect = (path: string)=>{return({request}:{request: Request })=>{consturl = new URL(request.url);constcurrentPath = url.pathname;if(currentPath === path){console.log(`이미 ${path}에 있음 - 리다이렉트 안 함`);returnnull;}console.log(`${currentPath}에서 ${path}로 리다이렉트`);returnredirect(path);};};functionHomePage(){return(<divstyle={{padding:"24px",border:"1px solid #e2e8f0",borderRadius:"8px",backgroundColor:"#fafafa"}}><h1style={{color:"#0f172a",fontSize:"1.25rem",fontWeight:"600",marginBottom:"8px"}}>Home Page</h1><pstyle={{color:"#64748b",fontSize:"0.875rem"}}>
This is the home page.
</p></div>);}functionService1Page(){return(<divstyle={{padding:"24px",border:"1px solid #e2e8f0",borderRadius:"8px",backgroundColor:"#fafafa"}}><h1style={{color:"#0f172a",fontSize:"1.25rem",fontWeight:"600",marginBottom:"8px"}}>Service 1 Page</h1><pstyle={{color:"#64748b",fontSize:"0.875rem"}}>
This is Service 1 page.
</p></div>);}functionService2Page(){return(<divstyle={{padding:"24px",border:"1px solid #e2e8f0",borderRadius:"8px",backgroundColor:"#fafafa"}}><h1style={{color:"#0f172a",fontSize:"1.25rem",fontWeight:"600",marginBottom:"8px"}}>Service 2 Page</h1><pstyle={{color:"#64748b",fontSize:"0.875rem"}}>
This is Service 2 page.
</p></div>);}functionNoticePage(){return(<divstyle={{padding:"24px",border:"1px solid #e2e8f0",borderRadius:"8px",backgroundColor:"#fafafa"}}><h1style={{color:"#0f172a",fontSize:"1.25rem",fontWeight:"600",marginBottom:"8px"}}>Notice Page</h1><pstyle={{color:"#64748b",fontSize:"0.875rem",marginBottom:"12px"}}>
This is Notice page. This is a protected route.
</p><Linkto="/"style={{color:"#3b82f6",fontSize:"0.875rem",textDecoration:"underline"}}>
Go to Home
</Link></div>);}functionLayout(){return(<divstyle={{padding:"20px",fontFamily:"sans-serif"}}><Outlet/></div>);}constrouter = createBrowserRouter(createRoutesFromElements(<Routepath="/"element={<Layout/>}loader={forceRedirect("/notice-page")}><Routeindexelement={<HomePage/>}/><Routepath="service1"element={<Service1Page/>}/><Routepath="service2"element={<Service2Page/>}/><Routepath="notice-page"element={<NoticePage/>}/></Route>));exportdefaultfunctionApp(){return<RouterProviderrouter={router}/>;}
import{createBrowserRouter,createRoutesFromElements,Route,RouterProvider,Outlet,Link,redirect,}from"react-router-dom";constforceRedirect = (path: string)=>{return({request}:{request: Request })=>{consturl = new URL(request.url);constcurrentPath = url.pathname;if(currentPath === path){console.log(`이미 ${path}에 있음 - 리다이렉트 안 함`);returnnull;}console.log(`${currentPath}에서 ${path}로 리다이렉트`);returnredirect(path);};};functionHomePage(){return(<divstyle={{padding:"24px",border:"1px solid #e2e8f0",borderRadius:"8px",backgroundColor:"#fafafa"}}><h1style={{color:"#0f172a",fontSize:"1.25rem",fontWeight:"600",marginBottom:"8px"}}>Home Page</h1><pstyle={{color:"#64748b",fontSize:"0.875rem"}}>
This is the home page.
</p></div>);}functionService1Page(){return(<divstyle={{padding:"24px",border:"1px solid #e2e8f0",borderRadius:"8px",backgroundColor:"#fafafa"}}><h1style={{color:"#0f172a",fontSize:"1.25rem",fontWeight:"600",marginBottom:"8px"}}>Service 1 Page</h1><pstyle={{color:"#64748b",fontSize:"0.875rem"}}>
This is Service 1 page.
</p></div>);}functionService2Page(){return(<divstyle={{padding:"24px",border:"1px solid #e2e8f0",borderRadius:"8px",backgroundColor:"#fafafa"}}><h1style={{color:"#0f172a",fontSize:"1.25rem",fontWeight:"600",marginBottom:"8px"}}>Service 2 Page</h1><pstyle={{color:"#64748b",fontSize:"0.875rem"}}>
This is Service 2 page.
</p></div>);}functionNoticePage(){return(<divstyle={{padding:"24px",border:"1px solid #e2e8f0",borderRadius:"8px",backgroundColor:"#fafafa"}}><h1style={{color:"#0f172a",fontSize:"1.25rem",fontWeight:"600",marginBottom:"8px"}}>Notice Page</h1><pstyle={{color:"#64748b",fontSize:"0.875rem",marginBottom:"12px"}}>
This is Notice page. This is a protected route.
</p><Linkto="/"style={{color:"#3b82f6",fontSize:"0.875rem",textDecoration:"underline"}}>
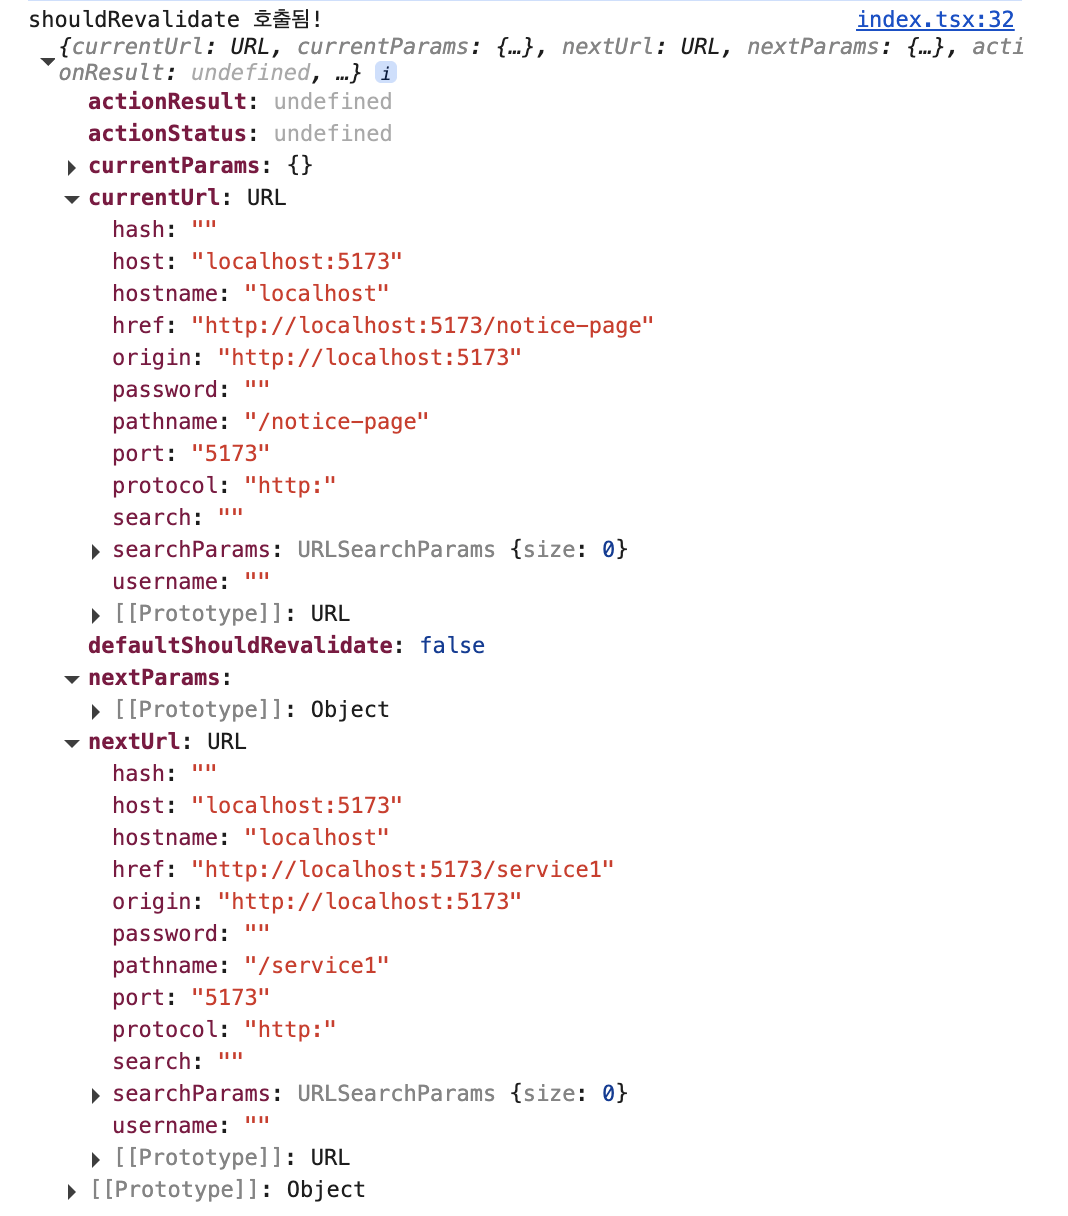
Go to Home
</Link></div>);}functionLayout(){return(<divstyle={{padding:"20px",fontFamily:"sans-serif"}}><Outlet/></div>);}constrouter = createBrowserRouter(createRoutesFromElements(<Routepath="/"element={<Layout/>}loader={forceRedirect("/notice-page")}shouldRevalidate={()=>true}><Routeindexelement={<HomePage/>}/><Routepath="service1"element={<Service1Page/>}/><Routepath="service2"element={<Service2Page/>}/><Routepath="notice-page"element={<NoticePage/>}/></Route>));exportdefaultfunctionApp(){return<RouterProviderrouter={router}/>;}
constNoticePage=()=>{return(<divstyle={{padding:"20px"}}><h1>Notice Page</h1><p>This is Notice page. This is a protected route.</p>// <Link to="/">Go to Home</Link><ahref="/">Go to Home</a>// here!!! 🙋♂️</div>);};
즉 React Router의 client-side navigation을 우회하고, 브라우저 기본 네비게이션에 의해 document가 새로 로드된다.
앱이 처음 로드되는 것과 동일한 흐름으로 동작하며, 해당 URL에 매칭되는 모든 route의 loader가 초기 로딩 단계에서 다시 실행된다.
이 때문에 loader가 동작한다.
import{createBrowserRouter,createRoutesFromElements,Route,RouterProvider,Outlet,redirect,}from"react-router-dom";constforceRedirect = (path: string)=>{return({request}:{request: Request })=>{consturl = new URL(request.url);constcurrentPath = url.pathname;if(currentPath === path){console.log(`이미 ${path}에 있음 - 리다이렉트 안 함`);returnnull;}console.log(`${currentPath}에서 ${path}로 리다이렉트`);returnredirect(path);};};functionHomePage(){return(<divstyle={{padding:"24px",border:"1px solid #e2e8f0",borderRadius:"8px",backgroundColor:"#fafafa"}}><h1style={{color:"#0f172a",fontSize:"1.25rem",fontWeight:"600",marginBottom:"8px"}}>Home Page</h1><pstyle={{color:"#64748b",fontSize:"0.875rem"}}>
This is the home page.
</p></div>);}functionService1Page(){return(<divstyle={{padding:"24px",border:"1px solid #e2e8f0",borderRadius:"8px",backgroundColor:"#fafafa"}}><h1style={{color:"#0f172a",fontSize:"1.25rem",fontWeight:"600",marginBottom:"8px"}}>Service 1 Page</h1><pstyle={{color:"#64748b",fontSize:"0.875rem"}}>
This is Service 1 page.
</p></div>);}functionService2Page(){return(<divstyle={{padding:"24px",border:"1px solid #e2e8f0",borderRadius:"8px",backgroundColor:"#fafafa"}}><h1style={{color:"#0f172a",fontSize:"1.25rem",fontWeight:"600",marginBottom:"8px"}}>Service 2 Page</h1><pstyle={{color:"#64748b",fontSize:"0.875rem"}}>
This is Service 2 page.
</p></div>);}functionNoticePage(){return(<divstyle={{padding:"24px",border:"1px solid #e2e8f0",borderRadius:"8px",backgroundColor:"#fafafa"}}><h1style={{color:"#0f172a",fontSize:"1.25rem",fontWeight:"600",marginBottom:"8px"}}>Notice Page</h1><pstyle={{color:"#64748b",fontSize:"0.875rem",marginBottom:"12px"}}>
This is Notice page. This is a protected route.
</p><ahref="/"style={{color:"#3b82f6",fontSize:"0.875rem",textDecoration:"underline"}}>
Go to Home (a 태그)
</a></div>);}functionLayout(){return(<divstyle={{padding:"20px",fontFamily:"sans-serif"}}><Outlet/></div>);}constrouter = createBrowserRouter(createRoutesFromElements(<Routepath="/"element={<Layout/>}loader={forceRedirect("/notice-page")}><Routeindexelement={<HomePage/>}/><Routepath="service1"element={<Service1Page/>}/><Routepath="service2"element={<Service2Page/>}/><Routepath="notice-page"element={<NoticePage/>}/></Route>));exportdefaultfunctionApp(){return<RouterProviderrouter={router}/>;}
import{createBrowserRouter,createRoutesFromElements,Route,RouterProvider,Outlet,Navigate,useLocation,Link,}from"react-router-dom";functionAppGuard(){constlocation = useLocation();constmaintenancePath = "/notice-page";if(location.pathname !== maintenancePath){console.log(`${location.pathname}에서 ${maintenancePath}로 리다이렉트`);return<Navigateto={maintenancePath}replace/>;}return<Outlet/>;}functionHomePage(){return(<divstyle={{padding:"24px",border:"1px solid #e2e8f0",borderRadius:"8px",backgroundColor:"#fafafa"}}><h1style={{color:"#0f172a",fontSize:"1.25rem",fontWeight:"600",marginBottom:"8px"}}>Home Page</h1><pstyle={{color:"#64748b",fontSize:"0.875rem"}}>
This is the home page.
</p></div>);}functionService1Page(){return(<divstyle={{padding:"24px",border:"1px solid #e2e8f0",borderRadius:"8px",backgroundColor:"#fafafa"}}><h1style={{color:"#0f172a",fontSize:"1.25rem",fontWeight:"600",marginBottom:"8px"}}>Service 1 Page</h1><pstyle={{color:"#64748b",fontSize:"0.875rem"}}>
This is Service 1 page.
</p></div>);}functionService2Page(){return(<divstyle={{padding:"24px",border:"1px solid #e2e8f0",borderRadius:"8px",backgroundColor:"#fafafa"}}><h1style={{color:"#0f172a",fontSize:"1.25rem",fontWeight:"600",marginBottom:"8px"}}>Service 2 Page</h1><pstyle={{color:"#64748b",fontSize:"0.875rem"}}>
This is Service 2 page.
</p></div>);}functionNoticePage(){return(<divstyle={{padding:"24px",border:"1px solid #e2e8f0",borderRadius:"8px",backgroundColor:"#fafafa"}}><h1style={{color:"#0f172a",fontSize:"1.25rem",fontWeight:"600",marginBottom:"8px"}}>Notice Page</h1><pstyle={{color:"#64748b",fontSize:"0.875rem",marginBottom:"12px"}}>
This is Notice page. This is a protected route.
</p><Linkto="/"style={{color:"#3b82f6",fontSize:"0.875rem",textDecoration:"underline"}}>
Go to Home
</Link></div>);}functionLayout(){return(<divstyle={{padding:"20px",fontFamily:"sans-serif"}}><Outlet/></div>);}constrouter = createBrowserRouter(createRoutesFromElements(<Routepath="/"element={<Layout/>}><Routeelement={<AppGuard/>}><Routeindexelement={<HomePage/>}/><Routepath="service1"element={<Service1Page/>}/><Routepath="service2"element={<Service2Page/>}/><Routepath="notice-page"element={<NoticePage/>}/></Route></Route>));exportdefaultfunctionApp(){return<RouterProviderrouter={router}/>;}